Painting Your Home for Sale: The Art of Selecting Winning Colors

As a professional painter who has seen countless homes transformed for the market, I’ve witnessed first-hand the significant impact the right paint colors can have on a home’s saleability.

Painting your home for sale isn’t just about freshening up the walls; it’s about creating a canvas that potential buyers can envision as their own.

The choice of color plays a pivotal role in this process, making spaces feel welcoming, spacious, and versatile. Here’s my guide to selecting paint colors that can help your home sell faster, based on years of experience and successful sales.

The Psychology of Color in Home Sales

Color psychology is a powerful tool in home staging. Neutral colors are universally appealing because they form a subtle backdrop that allows buyers to imagine their lives and belongings in the space. These colors also reflect light beautifully, making your home appear brighter and more spacious—a key selling point.

Choosing the Right Neutral Palette

Soft Whites and Creams: Far from being stark or clinical, soft whites and creams can make spaces feel airy and expansive. They work well in almost any room, enhancing natural light and offering a sense of cleanliness and tranquility.

Warm Grays: Warm grays are incredibly versatile, providing a modern yet timeless look that appeals to a wide range of tastes. They pair beautifully with both warm and cool tones, allowing for flexibility in decor.

Beige and Taupe: These colors add a bit more warmth than gray, creating cozy and inviting spaces. They’re perfect for living areas and bedrooms where you want to evoke a sense of comfort.

Greige: A blend of gray and beige, greige combines the best of both worlds. It’s neutral enough to be versatile, yet warm enough to add depth and character to a room.

Accent Colors: Yes or No?

While neutral walls are advisable, incorporating subtle accent colors can add dimension and interest to your home. Choose soft, muted hues for accents—think pastel blues, greens, or lavenders. These should be used sparingly, perhaps in a single wall or as part of a backsplash, to maintain the overall neutral theme.

Finishing Touches: Trim and Doors

Don’t overlook the power of trim, doors, and other details. Painting these elements in a crisp, clean white can frame your neutral walls beautifully, adding to the sense of space and cleanliness. High-gloss finishes on trim and doors can also add a touch of luxury and durability.

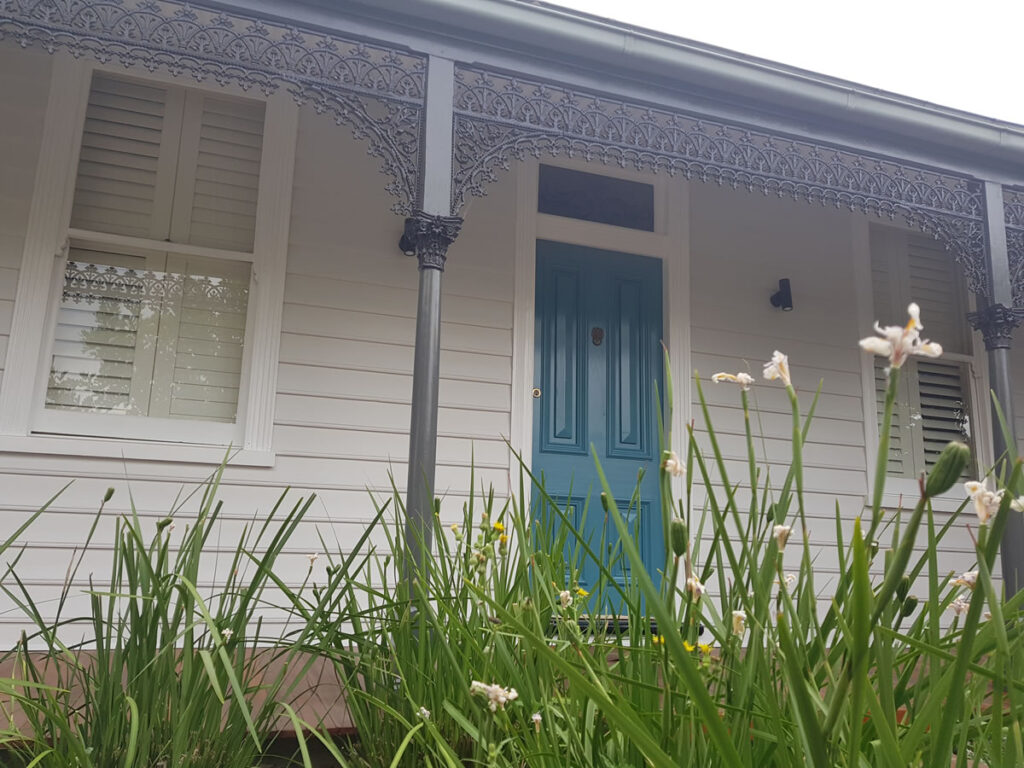
The Exterior Matters Too

First impressions are crucial, and the exterior of your home is the first thing potential buyers will see. Opt for neutral exterior colors as well, complemented by a contrasting front door in a welcoming color like deep blue, red, or green. This can add curb appeal and make your home stand out in buyers’ minds.

Tips for a Successful Paint Job

Quality Over Quantity: Invest in high-quality paint and professional application. A well-done paint job can make a world of difference in how your home is perceived.

Lighting Is Key: Consider how natural and artificial light will interact with your paint colors at different times of the day. Light can dramatically affect how colors appear, so test samples in various lighting conditions.

Keep It Consistent: Use the same neutral palette throughout the home to create a cohesive look. This doesn’t mean every room has to be the same color, but sticking to the same family of neutrals can enhance the sense of flow and spaciousness.

Final Thoughts

Painting your home for sale is an investment in its future. By choosing the right colors, you’re not just preparing your home for the market; you’re setting the stage for potential buyers to fall in love with it. As a professional painter, I’ve seen the transformative power of paint time and again. With thoughtful selection and expert application, your home can make a lasting impression, helping it sell faster and for a better price. Remember, in the world of home sales, color is not just a detail—it’s a strategy.

Historical Home Painting Guide: Preserving the Past with Every Brushstroke

As a professional painter with a deep appreciation for history and architecture, I’ve had the privilege of working on several historical homes throughout my career. These projects are more than just painting jobs; they’re opportunities to honor and preserve the past.

For owners of older homes, choosing the right colors and products is crucial to maintaining the historical integrity of your property. Here’s my guide to navigating the complexities of painting a historical home, ensuring that every choice respects its rich heritage.

Understanding Your Home’s Historical Palette

The first step in any historical home painting project is research. Historical homes were often painted with a limited palette of colors that were available or popular during the period they were built. Many paint manufacturers now offer historical color collections, which are researched and formulated to match the pigments used in past centuries. Consulting with a historical society or a preservation organization can also provide valuable insights into the original colors of your home.

Choosing the Right Colors

Historical Accuracy vs. Personal Taste: While striving for historical accuracy is admirable, it’s also important to consider your personal taste and how the colors will fit with your current lifestyle and decor. Finding a balance between accuracy and personal preference is key.

Consider the Architecture: The architectural style of your home can offer clues about appropriate color schemes. Victorian homes, for example, often feature bold and complex color schemes, while Colonial homes tend to favor more subdued, earthy tones.

Use Period-appropriate Colors: Once you’ve identified the era of your home, select colors that were common during that time. This doesn’t mean you’re limited to one or two colors; historical homes often featured a variety of shades and hues, but they were typically used in a way that complemented the architectural details and materials.

Selecting the Right Products

Quality Matters: Historical homes require high-quality paints that can provide durability and protection while also offering the right finish. Look for products specifically designed for use on older homes, which can accommodate the unique challenges they present, such as higher levels of moisture or the need for greater breathability.

Lead Safety: Many historical homes were originally painted with lead-based paint. Before beginning any project, it’s crucial to test for lead and follow proper safety protocols for removal or encapsulation. Hiring professionals trained in lead-safe practices is often the best course of action.

Choosing Finishes: The finish of the paint can also impact the historical accuracy of your project. Matte or flat finishes were most common in the past, as high-gloss finishes were harder to achieve. However, certain areas, like trim and doors, may benefit from a higher gloss for durability and contrast.

Techniques for Historical Homes

Attention to Detail: Painting a historical home often involves intricate detailing and craftsmanship. Techniques such as wood graining, marbling, and stenciling can add depth and authenticity to your project.

Preservation Over Perfection: Part of the charm of historical homes is their imperfections. While preparation and repair are important, preserving original textures and materials should take precedence over achieving a flawless finish.

Working with Professionals

While DIY can be rewarding, working with professionals who specialize in historical restorations can ensure that your project is both historically accurate and beautifully executed. Look for painters and contractors with experience in historical preservation and a portfolio of similar projects.

Final Thoughts

Painting a historical home is a journey through time. It’s an opportunity to connect with the past and preserve it for future generations. As a professional painter, I find these projects to be among the most rewarding.

They require a blend of research, craftsmanship, and respect for history that goes beyond the average painting job. For homeowners, the result is not just a beautifully painted house, but a living piece of history that continues to tell its story.

Remember, every brushstroke on a historical home is a testament to its endurance and the care of those who continue to cherish it. With the right approach, you can ensure that your home remains a vibrant link to the past, beautifully preserved for years to come.

Maximizing Small Spaces with Paint: A Professional Painter’s Guide

In my years as a professional painter, I’ve encountered numerous challenges, but one of the most rewarding tasks has been transforming small, cramped spaces into rooms that feel spacious and welcoming.

The power of paint in altering perception is remarkable, and with the right colors and techniques, even the tiniest of rooms can feel larger. Here’s my guide to maximizing small spaces with paint, drawing from my experiences and successes in the field.

Understanding Color Psychology

Before we dive into techniques, it’s crucial to understand the basics of color psychology. Light colors, such as soft whites, creams, pastels, and cool blues or greens, are known to make spaces feel more open and airy. They reflect light, making the room appear brighter and larger. On the other hand, dark colors tend to absorb light, making a space feel smaller and more enclosed. However, this doesn’t mean you should avoid dark colors entirely; when used correctly, they can add depth and interest to a room.

Tips for Choosing the Right Colors

  1. Go for Light and Bright: To create the illusion of more space, opt for light and neutral colors for the majority of the room. These shades serve as a blank canvas, making your space feel more open and less cluttered.
  2. Consider the Ceiling: Painting the ceiling a lighter color than the walls can make it seem higher, enhancing the feeling of spaciousness. A classic trick is to use a slightly lighter shade of the wall color for the ceiling.
  3. Use Monochromatic Schemes: Sticking to one color or varying shades of the same color can create a seamless look, helping to open up the room. Contrast can break up space, making it feel smaller, so a monochromatic palette helps to avoid this.

Painting Techniques to Enhance Space

  1. Stripes: Vertical stripes can make a room feel taller, while horizontal stripes can make it seem wider. Use a subtle contrast in colors to avoid overwhelming the space.
  2. Accent Walls: Painting one wall a different color can create depth and the illusion of distance. Choose a wall at the far end of the room for the best effect.
  3. Glossy Finishes: High-gloss paint finishes can reflect light, contributing to a more open feel. Consider using a glossy finish for trim work or an accent wall for added impact.
  4. Connect Spaces with Color: If you’re painting multiple small rooms, use a consistent color scheme to create a sense of flow and expansiveness throughout the home.

Additional Tips for Maximizing Space

  • Furniture and Decor: Keep furniture and decor minimal and in proportion to the room. Clutter can make a small space feel even smaller, so opt for pieces that are both functional and space-efficient.
  • Lighting: Good lighting is essential in making a room feel larger. Combine natural light with strategically placed artificial sources to brighten up the space and enhance the effect of your paint choices.
  • Mirrors: Incorporating mirrors can amplify the effect of your paint colors by reflecting light and creating the illusion of more space. Place mirrors opposite windows or in dark corners to maximize their impact.

Final Thoughts

Transforming a small space with paint is an art and science, combining knowledge of color psychology with creative painting techniques. As a professional painter, I’ve seen firsthand how a thoughtful approach to color and design can make even the smallest room feel larger and more inviting. Remember, the goal is not just to make a space feel bigger but to create an environment that feels welcoming and comfortable for you and your guests.

By following these tips and embracing the transformative power of paint, you can turn any cramped space into a cozy haven that feels both spacious and inviting. Happy painting!

DIY House Painting Tips for Beginners: A Professional Painter’s Guide

Embarking on a DIY house painting project can be an exciting yet daunting task for beginners. As a seasoned professional painter, I’ve seen my fair share of DIY projects—the good, the bad, and the downright ugly. Through these experiences, I’ve gathered a wealth of knowledge that I’m eager to share with you. Here are my top tips, tool recommendations, and techniques to help you achieve a professional-quality paint job on your own.

1. Start with a Plan

Before you dip your brush into the paint, it’s crucial to have a clear plan. Decide which rooms or exterior areas you’re going to paint and in what order. Consider factors like the amount of natural light, the room’s function, and how the colors will flow from one room to another. A well-thought-out plan will save you time and help ensure a cohesive look.

2. Choose Your Paint Wisely

The type of paint you choose is as important as the color. For interiors, water-based paints (latex) are popular due to their easy cleanup and short drying times. For exteriors, oil-based paints might be preferable for their durability. Also, consider the finish—gloss, semi-gloss, satin, eggshell, or flat—each has its place and advantages.

3. Invest in Quality Tools

Good tools can make a significant difference in the outcome of your paint job. Here’s a basic toolkit I recommend for DIY painters:

  • High-quality brushes: A 2-inch angled brush is versatile for both trim work and cutting in.
  • Rollers and roller covers: Use a roller for larger surfaces. The nap (or thickness) of the roller cover should match the texture of your walls.
  • Paint tray: For holding paint while you use the roller.
  • Drop cloths: Protect your floors and furniture from drips and spills.
  • Painter’s tape: For clean edges around trim, windows, and doors.
  • Extension pole: For reaching high walls and ceilings without a ladder.

4. Prep Like a Pro

As I’ve emphasized before, preparation is key. Clean your walls, repair any damage, sand rough spots, and apply primer if needed. This groundwork will not only make your paint look better but also last longer.

5. Master the Techniques

  • Cutting in: This technique involves painting the corners, edges, and trim of a room before using a roller on the larger areas. It requires a steady hand and a bit of patience but is crucial for a clean, professional look.
  • Rolling: When using a roller, start from the middle of the wall and roll upwards and then downwards in a W pattern for even coverage. Avoid pressing too hard to prevent roller marks.
  • Avoiding drips and streaks: Keep a wet edge by overlapping your strokes before the paint dries. This technique helps prevent drips and streaks.

6. Take Your Time

Rushing a paint job is a surefire way to end up with less-than-stellar results. Take your time, especially with the prep work and cutting in. If you’re not confident in your technique, practice on a piece of cardboard or an inconspicuous area first.

7. Maintain a Clean Workspace

Keep your brushes and rollers clean, and wrap them in plastic wrap if you’re taking a break but plan to use them again soon. Spills and drips are inevitable, but they’re much easier to clean up when they’re fresh.

8. Safety First

Ensure good ventilation, especially when using oil-based paints or primers. Wear protective gear as needed, such as gloves and masks, to protect yourself from fumes and paint splatters.

9. Learn from Mistakes

Even professionals make mistakes, but what sets them apart is their ability to fix them. If you drip paint on the floor, wipe it up immediately. If you’re unhappy with a color once it’s on the wall, remember that it’s just paint, and you can always change it.

10. Enjoy the Process

Finally, remember to enjoy the process of transforming your space. Painting can be therapeutic and rewarding, especially when you step back and see the fruits of your labor.

By following these tips and embracing the journey of DIY house painting, you’ll not only improve the look of your home but also gain a sense of accomplishment and perhaps discover a new hobby. Happy painting!

Step-by-Step Guide to Preparing Your House for Painting: A Professional House Painter’s Checklist

As a professional house painter with years of experience under my belt, I’ve learned that the secret to a flawless paint job isn’t just in the stroke of the brush or the quality of the paint, but in the preparation that precedes the painting. Preparing your house for painting is a critical step that ensures the longevity of your paint job and the beauty of your home. Here’s my comprehensive checklist to prepare your walls for a fresh coat of paint, shared from my firsthand experiences.

1. Inspect and Assess Your Walls

The first step is always to inspect the surfaces you plan to paint. Look for signs of damage such as cracks, holes, and peeling paint. Assessing the condition of your walls helps you understand the extent of prep work needed. It’s not just about making the walls look pretty; it’s about ensuring they’re in good condition to receive paint.

2. Wash the Walls

You might not see it at first glance, but walls accumulate a lot of dust, dirt, and grime over time. Washing your walls is crucial for removing these layers that can prevent paint from adhering properly. I recommend using a mild detergent and water for most interior walls. For exteriors, a pressure washer can be highly effective, but be mindful of the water pressure to avoid damaging the surfaces.

3. Scrape Off Loose Paint

Once the walls are clean and dry, the next step is to scrape off any loose or peeling paint. This task requires a scraper and a steady hand. Removing the old, flaking paint creates a smoother surface and ensures that your new paint adheres better and lasts longer.

4. Sand the Surfaces

Sanding is an essential step in the preparation process. It helps to smooth out any rough patches and creates a surface that paint can easily stick to. For interior walls, a fine-grit sandpaper should suffice. For exteriors, you might need something a bit coarser. Remember, the goal is to achieve a smooth, even surface.

5. Fill Holes and Cracks

After sanding, you’ll likely notice imperfections such as holes and cracks. Using a spackling compound or filler, fill these in and let them dry according to the product’s instructions. Once dry, sand the area again to ensure it’s flush with the rest of the wall. This step is crucial for achieving a professional-looking finish.

6. Caulk Gaps

Gaps between walls, windows, doors, and trim should be caulked to prevent moisture from getting under the paint, which can cause it to peel. Use a paintable caulk to fill these gaps. Not only does this step protect your paint job, but it also gives your project a clean, finished look.

7. Tape Off Areas

Masking tape is your friend. Use it to protect areas you don’t want to be painted, such as trim, windows, and door frames. This step might seem tedious, but it’s worth the effort. A professional painter’s job is as much about precision and care as it is about painting.

8. Prime the Walls

Primer is often overlooked by amateurs, but never by professionals. Applying a coat of primer ensures that your paint adheres properly and provides a uniform surface for the paint to cover. It’s especially important if you’re making a drastic color change or painting over a darker color.

9. Choose the Right Paint

Finally, choosing the right type of paint is just as important as the prep work. Consider the room’s function, the surface you’re painting, and the finish you desire. If you’re unsure, don’t hesitate to ask a professional at your local paint store for advice.

10. Ventilate the Area

Before you start painting, ensure the area is well-ventilated. Open windows and doors, and use fans if necessary. Proper ventilation is crucial for your health and helps the paint dry faster and more evenly.

By following these steps, you’re not just preparing your house for painting; you’re ensuring that the finished product will be something you can be proud of for years to come. Remember, a paint job is only as good as the preparation that goes into it. As a professional painter, I can attest that taking the time to prepare properly is always worth the effort. Happy painting!

Driveways and paving


The driveway is one of the first things you see, as well as visitors it can make a huge difference to the appearance of your home. Painting it can transform it from tired to refreshed and vibrant.

As professional Painting Contractors we specialize in all aspects of House painting. Driveways and paving can add some color to your home as well as clean up those old tired looking areas.

Complete painting contractors can pressure clean, mold treat and Acid etch the job properly so you will get many years of use. As professional house painters we have the product knowledge to use the best product which withstands the most wear and tear to suit your house painting requirements. As Painting Contractors We offer the best pricing and products on the central coast.

Working with the samaritans

I would like to thank John from Complete Painting for donating his time and materials to re paint the Samaritans office at Gorokan which is based in the Lakes Anglican Church Gorokan.

John was very knowledgeable and easy to communicate with. All the old paint was prepared and undercoated and our office furniture was covered and kept clean. The office is now a bright and fresh area to work and have our clients in. Thank you Complete painting.

Samaratians

Gorokan

Working with Covid-19

We here at complete painting are committed to providing expert and high-quality painting and services. All our qualified trades men have PPE protocols in place to protect the worker and clients. We continue to monitor the daily situation and follow all recommendations from the Australian government.

Our priories being to protect the health, safety and well-being of all our tradesmen’s, their families and our customers. We will continue to deliver the highest service standards to our clients by creating a safe environment. We will play our part to help minimise the spread of the virus.

We hope you are all staying safe,

Complete painters